How To Create A DIY Workshop In Your Garage

Are you tired of working on your DIY projects in cramped and cluttered spaces? If so, it’s time to transform your garage into a fully functional DIY workshop. In this article, we will explore the essential steps to create a DIY workshop in your garage, providing you with the space and organization you need to bring your creative ideas to life. From optimizing storage solutions to setting up a designated work area, get ready to turn your garage into the ultimate DIY haven.

Understanding the Space
Evaluating your garage space
When transforming your garage into a DIY workshop, the first step is to evaluate the available space. Measure the dimensions of your garage, taking into account the length, width, and ceiling height. This will give you an idea of how much room you have to work with and will help determine what kind of equipment and tools you can accommodate.
Determining workshop purpose
Before designing your workshop, it’s important to determine its purpose. Think about the kind of projects you plan to undertake and the tools and equipment you’ll need. Whether you’re into woodworking, automotive repairs, or any other DIY projects, understanding the specific requirements of your workshop will help you create a space tailored to your needs.
Planning the layout
Once you have evaluated the space and determined the purpose of your workshop, it’s time to plan the layout. Consider the flow of work and how different workstations will be arranged. Group similar tools and equipment together to create functional zones within your workshop. This will make it easier to find what you need and ensure a smooth workflow.
Safety Precautions
Fire safety measures
Safety should always be a top priority in any workshop, and fire prevention is no exception. Install fire extinguishers in easily accessible locations and make sure they are regularly inspected and maintained. Avoid using flammable materials and when possible, opt for non-combustible materials for your workshop. Keep your work area clean and free of clutter to minimize fire hazards.
Maintaining air quality
Working in a workshop can expose you to various air pollutants such as dust, fumes, and chemicals. To protect your health, ensure proper ventilation by installing fans or opening windows and doors when working on projects that produce fumes. Consider investing in an air filtration system to remove airborne particles and improve air quality in your workshop.
Electrical safety measures
Electrical safety is crucial in a workshop setting. Make sure your workshop is properly grounded and install ground fault circuit interrupter (GFCI) outlets to protect against electrical shocks. Avoid overloading electrical circuits by distributing your power usage across different outlets. Keep cords and cables organized to prevent tripping hazards and regularly check for any damaged or frayed wires.
Importance of a first aid kit
Accidents can happen even in the safest of workshops, so it’s essential to have a well-stocked first aid kit on hand. Keep it easily accessible and make sure all members of your household know its location. The kit should include basic supplies such as adhesive bandages, sterile dressings, antiseptic wipes, and any necessary personal medication.
Designing Your Workshop
Choosing a design style
Designing your workshop is not just about functionality; it’s an opportunity to create a space that reflects your personal style and inspires creativity. Consider your aesthetic preferences and choose a design style that appeals to you. Whether you prefer a rustic, industrial, or modern look, incorporating your desired design elements will make your workshop a more enjoyable space to work in.
Optimizing space usage
Garages are often limited in space, so it’s important to optimize your workshop layout to make the most of the available area. Utilize vertical space by installing wall-mounted shelves, pegboards, and racks to keep your tools organized and easily accessible. Consider using portable workbenches and collapsible tables that can be stored away when not in use to maximize flexibility.
Implementing comfortable work zones
Your workshop should not only be functional but also comfortable to work in. Create designated work zones for specific tasks and make sure each area is well-lit and properly equipped. Invest in ergonomic seating and anti-fatigue mats to reduce strain on your body during long hours of work. Having a comfortable workspace will enhance your productivity and enjoyment of DIY projects.
Creating flexible workspaces
Flexibility is key when it comes to a DIY workshop. Design your workspace in a way that allows for easy reconfiguration to accommodate different projects. Consider using mobile tool carts or workstations on wheels that can be easily moved around as needed. This will enable you to adapt your workshop to the demands of each project and make the most efficient use of your space.
Flooring Options
Understanding the importance of durable flooring
The flooring in your workshop plays a crucial role in ensuring safety and functionality. It should be able to withstand heavy tools, equipment, and potential spills. Durable flooring is essential to prevent accidents, such as slips and falls. Additionally, a good-quality flooring will also help protect your tools from damage if they are accidentally dropped.
Exploring various flooring materials
There are several flooring options to consider for your workshop. Concrete is a popular choice due to its durability and affordability. It can be left untreated or coated with epoxy for added protection. Rubber flooring provides excellent shock absorption and is ideal for reducing fatigue during long hours of standing. Another option is interlocking floor tiles, which are easy to install, offer good traction, and can be replaced individually if damaged.
Considering comfort and safety in choosing a floor
When selecting a flooring material for your workshop, it’s important to prioritize both comfort and safety. Choose a floor that provides sufficient cushioning to reduce fatigue during long hours of work. Additionally, opt for a surface that offers good traction to prevent slips and falls. It’s also worth considering a floor that is easy to clean and resistant to stains, as spills are inevitable in a workshop setting.

Climate Controls
Factors affecting the garage climate
Creating a comfortable working environment in your garage workshop involves considering the factors that can affect the climate. Insulation is important for regulating temperature and reducing heat loss or gain. The garage’s location, exposure to sunlight, and the surrounding environment, such as nearby trees or buildings, can also impact the temperature within the space. Understanding these factors will help you determine the best solutions for heating and cooling your workshop.
Options for heating and cooling
To ensure year-round comfort in your workshop, you’ll need to implement heating and cooling systems. For heating, options include electric heaters, gas heaters, or radiant heating systems. Cooling can be achieved through portable air conditioners, ceiling fans, or using natural ventilation methods. Consider your climate, budget, and the size of your workshop when selecting the most suitable heating and cooling options.
Proper insulation methods
Insulation plays a crucial role in maintaining a comfortable temperature in your garage workshop. Properly insulating the walls, ceiling, and door will help regulate the heat and cold, making your workshop more energy-efficient. Choose insulation materials that provide good thermal resistance and consider adding weatherstripping to seal any gaps or cracks that may let air in or out.
Importance of lighting and ventilation
Good lighting and ventilation are essential in a workshop. Proper lighting is important for safety and visibility when working on intricate projects. Consider a combination of overhead lighting, task lighting, and natural lighting through windows or skylights. Adequate ventilation will not only improve air quality but also help dissipate fumes and odors. Install exhaust fans or open windows and doors to ensure proper airflow in your workshop.
Storage Solutions
Organizing tools for efficiency
Efficient organization of your tools is key to maximizing productivity and minimizing clutter in your workshop. Categorize your tools based on their function and frequency of use. Use tool chests or tool cabinets with drawers to keep smaller hand tools organized and easily accessible. Consider using pegboards or magnetic strips to hang frequently used tools for quick and convenient access.
Designing a custom tool rack
A custom tool rack can be a great addition to your workshop, providing a designated space for larger tools such as hammers, saws, and drills. Build or purchase a sturdy rack that can securely hold your tools without taking up too much space. Consider organizing your tools on the rack in a way that matches your workflow, allowing for easy identification and retrieval when needed.
Implementing vertical storage solutions
Vertical storage solutions are a great way to maximize space in your workshop. Install wall-mounted shelves, cabinets, or open shelving units to store items that are not frequently used. Utilize the vertical space above workbenches and countertops, making sure to secure the shelves properly to prevent accidents. This will help keep your workspace clutter-free and ensure that tools and materials are within reach whenever you need them.
Choosing storage units for your workspace
When selecting storage units for your workshop, consider your specific needs and the size of your space. Modular storage systems, such as stackable drawers or rolling tool chests, offer great flexibility and allow for easy customization. Cabinets with adjustable shelves are ideal for storing larger items and can help keep your workshop organized. Remember to label your storage units for quick identification, making it easier to find what you’re looking for.
Worksurfaces and Workbenches
Choosing the correct workbench
A workbench is a fundamental element of any DIY workshop. When choosing a workbench, consider your specific needs and the type of projects you will be working on. Look for a sturdy workbench with a strong work surface that can handle heavy loads and withstand the demands of your projects. Consider additional features such as built-in storage, adjustable height, and a vise or clamping system that will enhance the functionality of your workbench.
Optimizing worksurface materials
The material you choose for your worksurface will depend on the type of projects you plan to undertake. A solid hardwood surface provides durability and resistance to scratches, while a laminated surface offers easy maintenance and moisture resistance. Consider using a sacrificial top or replaceable inserts for your workbench to protect the surface from damage caused by cutting or drilling.
Maintaining a clean and clutter-free worksurface
Keeping your worksurface clean and clutter-free is essential for maintaining an efficient and functional workshop. Develop a habit of cleaning up after each project to prevent dust, debris, and spills from accumulating. Implement a system for organizing tools and materials so that they are easily accessible and promptly returned to their designated storage spaces. This will not only improve your productivity but also prolong the life of your worksurface.
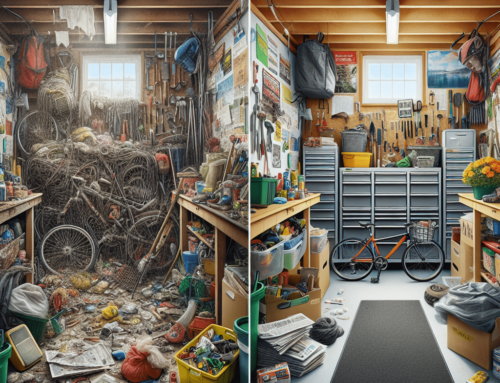
Can Maximizing Space in Your Garage Help with Creating a DIY Workshop?
Maximizing garage space techniques can definitely help in creating a DIY workshop. Utilize wall storage, overhead racks, and multipurpose furniture to maximize space. Organizing tools and supplies will make the workshop more efficient and enjoyable. With the right techniques, your garage can become the perfect workspace for your DIY projects.
Tools and Equipment
Essential tools for a DIY workshop
Investing in quality tools is essential for a well-equipped DIY workshop. Some essential tools to consider include a cordless drill, circular saw, jigsaw, sander, and a selection of hand tools such as screwdrivers, wrenches, and pliers. Additionally, consider specialized tools based on your specific interests and projects. Purchase tools that are durable, ergonomic, and suited to the tasks at hand to ensure a successful and enjoyable workshop experience.
Maintaining and storing your tools
Proper maintenance and storage of your tools are crucial for their longevity and performance. Clean your tools after each use, removing any dust or debris that may have accumulated. Apply a light coat of lubricant or rust inhibitor to prevent corrosion. Store your tools in a dry and secure location, such as a tool chest or pegboard, to protect them from damage and ensure easy access.
Investing in quality tools
While it may be tempting to opt for cheaper tools, investing in quality tools will ultimately save you time, money, and frustration. Quality tools are built to last and are more durable, ensuring they can withstand the demands of DIY projects. They also tend to offer better performance, improving the quality of your work. Research reputable brands and read reviews to make informed decisions about which tools are worth investing in.
Choosing power equipment
Power equipment can significantly enhance your productivity in a DIY workshop. When choosing power equipment, consider the type of projects you will be working on and the power requirements of each tool. Look for features such as adjustable speed, ergonomic design, and safety features like blade guards or built-in dust collection systems. Invest in reliable and reputable brands that offer warranties and support services.
Electrical Setup
Planning your electrical layout
A well-planned electrical layout is essential for a safe and functional workshop. Consider the location of power sources, the number of outlets you will need, and the power requirements of your tools and equipment. Map out the electrical circuits and plan for the proper distribution of power to avoid overloading circuits. Consult with a licensed electrician if needed to ensure your electrical setup meets code requirements.
Installation of power outlets
Having an adequate number of power outlets in your workshop is crucial for powering your tools and equipment. Install outlets strategically throughout your workspace, placing them at convenient locations near workstations to minimize the need for extension cords. Opt for grounded outlets to ensure proper electrical safety. Consider adding additional outlets for future expansion or installing dedicated circuits for heavy-duty equipment.
Understanding your power needs
Determining your power needs is critical to avoid overloading circuits and causing electrical hazards. Calculate the power requirements of your tools and equipment by checking their wattage or amperage ratings. Factor in any additional power needs for lighting, ventilation, or other accessories. Ensure that your electrical setup can handle the total power demand of your workshop, making allowances for future additions or upgrades.
Safety tips for electrical setup
Electrical safety should be a top priority when setting up your workshop. Avoid running extension cords across walkways or under carpets to prevent tripping hazards and potential damage to the cords. Use cord protectors or cable management systems to keep cords organized and prevent them from being accidentally unplugged. Regularly inspect your electrical equipment for any signs of damage or wear and replace or repair them as needed.
Final Touches
Decorating your workshop
Adding personal touches to your workshop will make it a more inviting and inspiring space. Consider decorating the walls with motivational posters, artwork, or even a chalkboard for jotting down project ideas or to-do lists. Hang up shelves or display cabinets to showcase completed projects or sentimental items related to your hobbies. Creating a space that reflects your personality will make your workshop feel like a true haven for creativity.
Organizing for easy access
Efficient organization is key to maintaining a functional workshop. Keep frequently used tools and materials within easy reach by implementing storage solutions such as wall-mounted racks, shelves, or tool chests. Label storage bins and containers to ensure everything has its designated place. Develop a system for organizing hardware and small parts, such as using clear plastic bins or drawer organizers. The easier it is to find what you need, the more enjoyable and efficient your workshop experience will be.
Workspace maintenance
Regular maintenance of your workshop is important to keep it clean, organized, and safe. Develop a routine for cleaning up after each project, including sweeping the floors, wiping down surfaces, and putting away tools and materials. Inspect your equipment for any signs of wear or damage and address any issues promptly. By keeping your workshop well-maintained, you’ll create a more productive and enjoyable space to work in.
Investing in comfort and ergonomics
A comfortable workspace is essential for long hours of work in your garage workshop. Invest in ergonomic seating that promotes good posture and reduces strain on your back and joints. Consider adding anti-fatigue mats to provide cushioning and support when standing for extended periods. Don’t overlook the importance of good lighting, as proper illumination will reduce eye strain and improve focus. Taking steps to prioritize comfort and ergonomics will enhance your overall workshop experience.
In conclusion, creating a DIY workshop in your garage requires careful planning and consideration of various factors. From evaluating your available space to designing a functional layout, ensuring proper safety measures, choosing the right flooring and storage solutions, and investing in quality tools and equipment, each aspect contributes to creating a productive and enjoyable workspace. With the right combination of design, organization, and comfort, your garage can be transformed into a DIY workshop that sparks creativity and allows you to pursue your hobbies and projects with ease.