
How to Take a Screenshot on a Chromebook

Screenshots are the most convenient way to save anything you saw or want to capture through the screen. But most of the time, taking screenshots on various apps is not as easy as it looks, primarily if you are operating a laptop or PC.
One of the most tricky screenshots is taking one on a Chromebook. Not to worry, this read will educate you through easy steps on how to take a screenshot on Chromebook. Let’s wait no more and get right into it.
The Solution
The first thing you need to ask yourself is whether you want a full screenshot of the screen or just of a specific area which is called a partial screenshot.
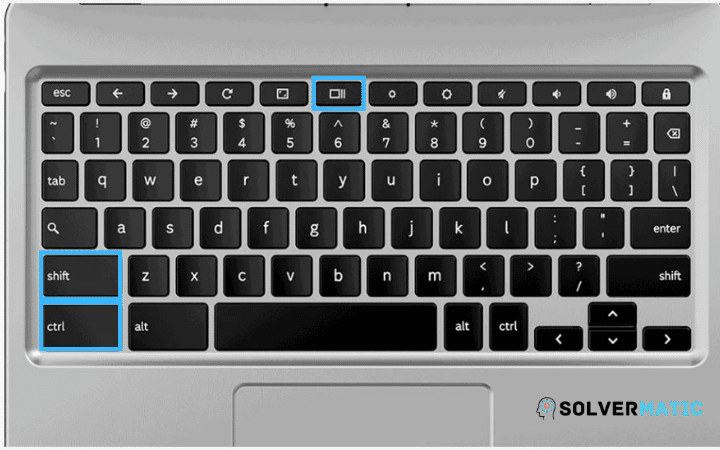
If you need a full screenshot then press, CTRL + Windows key to take a full screenshot, however, If you just want to take the screenshot of a specific area on the screen, then press SHIFT + CTRL + Show Windows, then click and drag, and voila! You got the partial screenshot
Now let’s discuss the step-by-step instructions on how to take screenshots on your Chromebook.
How To Take Full Screenshot
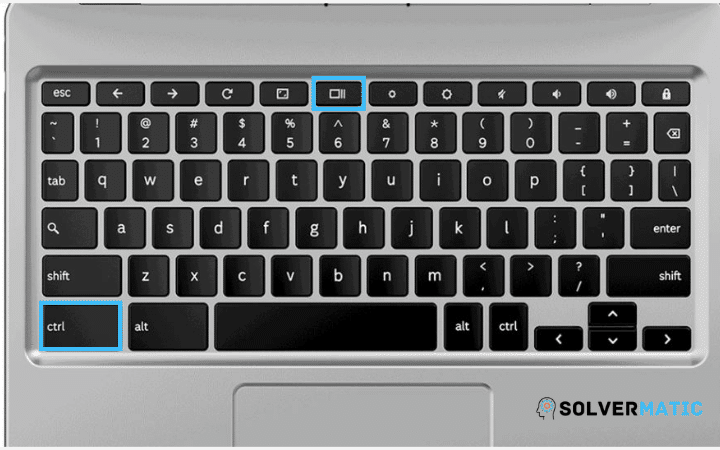
If you want to take a full screenshot of your Chromebook screen then simply press, CTRL with Show Windows key, and your screenshot will be saved on your computer.
This was an easy-to-understand part, but most people still struggle to find where Chrome OS has downloaded and stored their screenshot image.
It’s simple, by default all these external images are saved into the downloads folder, but it’s hard to find because all these image files has no name. It’s named after the date and time it was taken. Makes sense?
The real struggle now is how you will store these images so that it doesn’t vanish through cleanup? Yes, Google won’t save your ‘screenshots’ to your drive directly; you have to do that manually. Let’s take a look at how you can upload a chrome book screenshot to your drive.
- First, locate your image file in the downloads folder.
- Now, open your screenshot image file and you will see a share button somewhere on the screen; tap on that.
- A drop-down menu will appear; scroll down and click on save to drive.
How To Take Screenshot Of A Specific Area
As we mentioned above in a quick glimpse, how to take partial screenshots on your Chromebook, let’s discuss the steps in detail.
You must have thought about how will you mark that specific area on your PC or laptop? Don’t worry; this step-by-step guide will get you through.
- Press CTRL + SHIFT + Show WINDOWS button on the Chromebook key at the same time.
- Now you will notice that your mouse cursor has changed into a crosshair, just like any snipping tool Chromebook.
- You have to drag the cursor in a box shape to take a screenshot of a specific area. You can either use a mousepad or your finger to do it on a touchscreen laptop or tablet.
- Once you release the mouse cursor your screenshot will be taken efficiently.
The process of saving the screenshot image to your drive is the same as discussed above. Simply find the image file in your downloads folder and upload it to the drive by clicking on the share button. Once you click the share button, select “Save To Drive” from the dropdown list.
How to take a screenshot on Chromebook if you are using a tablet?
Most people like to go all spacious and confined at the same time by using a tablet to work on or for entertainment purposes. Now, it’s not hard to capture a screenshot without keyboard keys, but don’t worry we will share with you the quick solution.
There are two ways to capture a screenshot on a tablet,
- With stylus.
- Without a stylus.
For those who don’t know, the stylus is the pen that comes with your tablet.
Taking screenshot with Stylus (Pen)
Most people who like to take screenshots with the pen want a screenshot of a confined screen; yes, you could take a specific screenshot on your tablet too!
- Tap your pen
- Then a capture region option will appear; select that.
- Using your stylus, touch and hold on to the place where your screenshot box will start.
- Draw a box just like we discussed earlier with your stylus.
- Once you release your stylus, your screenshot will be taken, done!
Taking screenshot without Stylus (Pen)
It’s pretty simple to get a screenshot on your tablet without a pen because a tablet is just a larger phone.
- Just hold on to the volume and power button simultaneously, and you are good to go! You can find the screenshot later in your images folder.
See? It’s that easy to get a screenshot on Chromebook, you need the proper guidance, and this read above will help you through it quickly.
Final verdict
So, we hope you are well educated now on taking a screenshot on Chromebook without any issues and how to find them and save them to google drive.
You won’t have to search a dozen web pages now as you have found the perfect guide with all the best screenshot Chromebook shortcuts.
Want more tips and tricks with updates? Then stay tuned!
For any questions, suggestions and feedback, feel free to send us a message on our contact us page.
FAQs
You are either pressing the buttons too quick or too slow; try to push them all at once.
Yes, open the screenshot folder and double click on it; the writer view will appear. You can also open the image file with any third-party photo editor software and make edits like any other image.
All the image files are saved as PNG files.
The show window key is usually found in the top row (F5 spot) on a Chromebook keyboard.


